Yard & Landscaping
How to Plan a Backyard Layout
A practical walkthrough for designing a backyard from scratch. Learn how to map zones, work with your site conditions, and build a small backyard plan that a...
Planning a backyard layout is less about picking the prettiest design and more about asking the right questions first. Where does the sun land at noon? Which corner stays soggy after rain? Where do the kids cut across the grass? Once you know your site, the layout tends to suggest itself.
This guide walks through designing a backyard in a logical order, from observation to pencil-on-paper to shovel in the ground.
Start with What You Already Have
Before you sketch anything, spend a few days watching the yard. You are looking for patterns that a map alone cannot tell you.
Sun and shade. Walk the yard at 8 a.m., noon, and 5 p.m. on a clear day. Note which areas get full sun (six or more hours of direct light), which are partly shaded, and which stay in shadow most of the day. A seating area that sounds good on paper can be miserable if it bakes in the afternoon sun from June through August. A vegetable patch in the wrong spot simply will not produce.
Drainage. After the next good rain, go outside and look. Where does water pool? Where does it run off? Low spots that stay wet for hours after a storm are not good candidates for a patio or a lawn area, but they might work well for a rain garden or a planting of moisture-tolerant groundcovers.
Traffic patterns. Where do people naturally walk? If the household uses a path between the back door and the garage, that route will be walked regardless of what you plant there. Work with these lines, not against them.
Existing trees and structures. Note the drip line of any trees (roughly the outer edge of the canopy). Roots often extend well beyond the drip line. Hardscape placed over major roots can heave within a few seasons, and heavy digging near the trunk can compromise the tree.
Sketch a rough base map on graph paper, one square per foot if the yard is small, one square per two feet for larger spaces. Mark the house footprint, fences, gates, utilities, and any existing plants you want to keep.
Divide the Yard into Zones
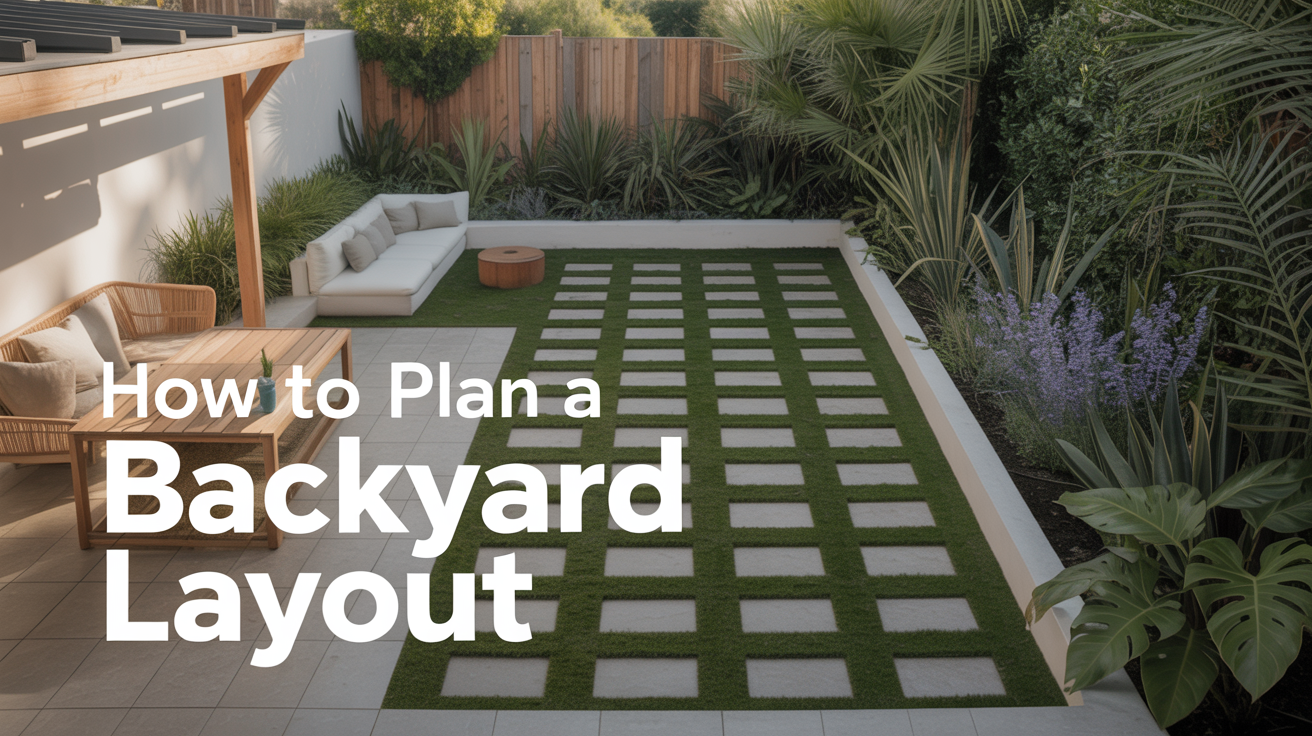
Thinking in zones in a yard helps you assign space to purpose before you commit to materials or plants. Most residential backyards can be organized around three or four zones.
Living and dining zone. This is where you put the table, chairs, or fire pit. It should be convenient to the kitchen door and ideally level. A patio, deck, or compacted gravel pad works here. Orient it to catch evening shade if you live in a warm climate, or morning sun if you are in a cooler region.
Activity zone. For households with children or dogs, a patch of durable turf or a low-maintenance lawn area earns its keep. Size this zone to what you will actually maintain. A lawn area that is rarely mowed or watered will become a weed patch quickly.
Garden and planting zone. Raised beds, perennial borders, and shrub plantings generally work best along the perimeter of the yard. Keeping ornamental and edible plantings out of the main traffic flow makes maintenance easier and protects plants from foot traffic.
Utility zone. Compost bins, tool storage, the HVAC condenser unit, and similar items need a spot that is accessible but out of the sightlines from the living area. A simple fence panel or a screen of tall ornamental grasses can separate the utility zone from the rest of the yard without much cost.
Not every yard needs all four zones. A small urban lot might have a living zone and a garden zone with no dedicated activity area. What matters is that each use has a clear home and that zones transition sensibly from one to the next.
Drawing a Small Backyard Plan
For compact spaces, the layout decisions feel more constrained, but a small backyard plan also has less room to hide a mistake. A few principles help.
Keep the patio proportional. A patio that is too small looks awkward and feels cramped once furniture is on it. A 10-by-12-foot space will hold a table for four with room to pull a chair back. Measure your furniture before you commit to dimensions.
Use vertical space. Fences, trellises, and tall narrow plants borrow visual space without eating into the footprint. A wall of climbing roses or a simple cedar trellis with annual vines adds presence without crowding the ground-level layout.
Reduce lawn where it is impractical. Grass needs sunlight, regular mowing, and consistent moisture. In a shaded small yard, the lawn area often struggles more than it thrives. A gravel path, a flagstone stepping-stone route, or ground covers for spots where grass won't grow can replace trouble spots with something that actually looks good through the season.
Connect zones with clear paths. In a small yard, defined paths prevent worn dirt lines from appearing through plantings. Simple stepping stones, a gravel strip, or a brick border is usually enough.
Choosing Materials That Match Your Climate and Budget
The materials you choose for paths, patios, and edging need to hold up to your winters and summers, not just look good in a catalog photo.
In cold climates, freeze-thaw cycles can shift pavers, crack concrete, and heave poorly set flagstone within a few seasons. A crushed stone base (typically four to six inches deep) under any paver surface allows some drainage and flex. Concrete pavers tend to hold up better than large poured-concrete slabs in freeze-prone regions because the joints allow movement.
In hot, dry climates, dark materials like black rubber mulch or dark-stained wood can radiate a surprising amount of heat back into the living area. Lighter gravel, pale stone, and light-colored composite decking stay cooler underfoot.
Mulching garden beds the right way makes a real difference in planting zones, both for moisture retention and for keeping the layout looking tidy. A two-to-three-inch layer of wood chip mulch in perennial beds is usually enough, kept a few inches clear of plant stems.
For lawn edges between grass and beds or paths, a clean physical border does more to hold the line than any chemical edging treatment. Edging a lawn for a clean, crisp border is a skill worth developing early in the season and repeating a few times a year.
Putting the Plan on Paper (and Then in the Ground)
Once you have a rough zone layout in mind, refine it with a scale drawing. Use graph paper and a measuring tape. Cut out paper rectangles scaled to your furniture dimensions and move them around on the drawing before settling on placement.
A few practical checks before you break ground:
- Call 811 (in the US) or your regional utility-locate service before digging anything more than a few inches deep. Underground utilities are not always where you expect.
- Check local codes for setback requirements if you plan a fence, shed, or structure. Many jurisdictions require permits for structures above a certain size.
- Phase the work. Most homeowners do not build out a full backyard in one season, and that is fine. Completing the patio and main path first gives you a usable outdoor space while you figure out the planting zones over time.
- Start with hard elements. Patios, paths, and edging should go in before plantings. It is far easier to plant around an established patio than to rebuild one around mature shrubs.
A Simple Layout Sequence
| Step | What Happens |
|---|---|
| 1. Observe | Sun, drainage, and traffic patterns noted |
| 2. Base map | Existing features drawn to scale |
| 3. Zone sketch | Living, activity, garden, utility zones assigned |
| 4. Material choices | Patio surface, paths, edging selected |
| 5. Utilities check | Locate underground lines before digging |
| 6. Build hard elements | Patio, paths, and edging installed first |
| 7. Plant and mulch | Beds planted, mulched, and edged |
Frequently Asked Questions
How much does it cost to design a backyard layout yourself? The design itself costs nothing but time. The real expense is materials and labor. A simple gravel patio and a few raised beds can be done for a few hundred dollars in materials if you do the work yourself. A full hardscape with a concrete patio and custom plantings can run into the thousands. Start with a clear plan and phase the work over time to avoid overcommitting budget upfront.
How do I figure out zones in a yard if it is oddly shaped? Irregular lots often benefit from treating the longest sightline as the organizing axis. Stand at the back door and look out. Whatever draws the eye becomes the focal point, and zones can radiate outward from there. Curves tend to work better than straight lines in oddly shaped spaces because they follow the natural contour of the lot.
Can I have a lawn and a garden in a small backyard? Yes, but be realistic about the size of each. A lawn patch smaller than about 10 by 10 feet is genuinely difficult to mow and maintain well. If the lawn area would be smaller than that, a groundcover, pea gravel, or stepping-stone surface is often a better use of the space.
What is the first thing I should build in a new backyard layout? The patio or main gathering area, if you plan to have one. It sets the scale for everything else and gives you a place to sit and think through the rest of the design as you go. Starting with plantings first and adding hardscape later usually means ripping something out eventually.
Do I need a landscape designer for designing a backyard? Not necessarily. For straightforward residential lots, a careful site observation, a scaled drawing, and some time researching plants suited to your climate and soil type is enough for most homeowners. Where a professional adds real value is in grading or drainage problems, retaining walls, or a complicated site with many constraints. For a standard flat-to-gently-sloped suburban backyard, the work described here is within most people's reach.