Tools & Equipment
How to Set Up and Adjust a Lawn Sprinkler
A practical guide to lawn sprinkler setup: choosing the right type, placing it correctly, dialing in coverage, and knowing how long to run it.
Getting water onto grass sounds simple until you end up with a soggy corner, a dry strip down the middle, and a hose that has kinked itself into a sculpture. A good sprinkler setup is mostly about placement and timing, and once you nail those two things the lawn takes care of itself between sessions.
Here is what you need to know to get a portable or hose-end sprinkler working well for your yard.
Types of Sprinklers and When to Use Each
Matching the tool to the yard shape saves a lot of frustration. Most home-use sprinklers fall into four categories.
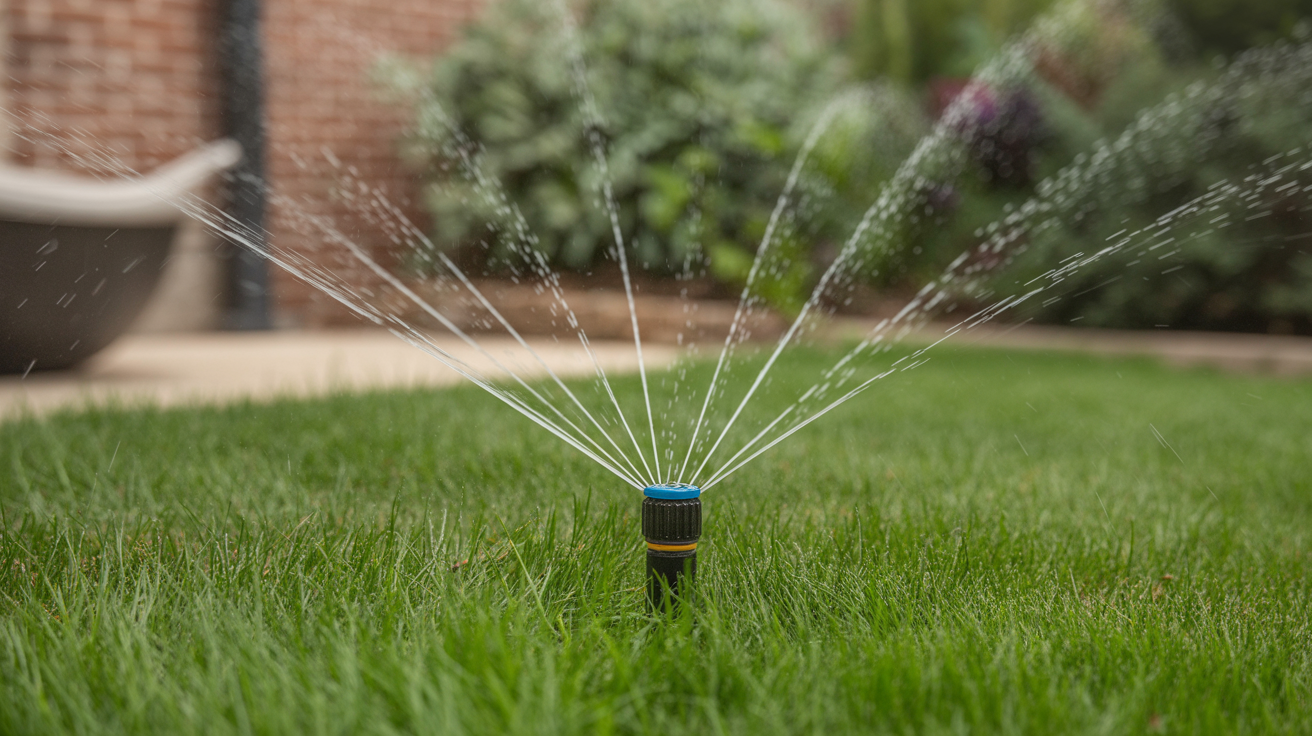
Oscillating sprinklers sweep a fan of water back and forth. They cover rectangular areas well, which suits most standard front or back yards. The spray stays relatively low, so wind can push it around on breezy days. Good choice for open, flat lawns.
Rotary or impulse sprinklers shoot a single stream that rotates in a circle or arc. They throw water farther than oscillating models, hold up well in wind, and handle larger or irregularly shaped areas. Adjustable models let you restrict the arc to a semicircle or a narrow wedge so you avoid spraying the driveway or a flower bed.
Stationary (fixed-spray) sprinklers sit in one position and water a fixed ring or pattern. Coverage is limited, but they work well for small patches, new seed areas, or tight spaces near walls where a swinging arm would catch on something.
In-ground pop-up systems are a permanent installation rather than portable tools. They are not in scope for a simple setup guide, but the coverage and timing principles below apply equally to them.
If you are still sorting out the right mower for the same lawn, the guide on choosing between a push, self-propelled, or riding mower covers that decision separately.
Setting Up a Portable Sprinkler
The physical setup takes about five minutes. The decisions you make during it affect every watering session after.
Step 1: Check the hose. A kinked or undersized hose starves the sprinkler of pressure and produces an uneven pattern. A standard 5/8-inch garden hose at normal household pressure works for most portable sprinklers. If you are running more than 100 feet of hose, expect some pressure drop.
Step 2: Connect the sprinkler to the hose. Most use a standard 3/4-inch hose thread fitting. Hand-tighten until snug, then a quarter turn more. A rubber washer in the coupling handles the seal; you do not need plumber's tape.
Step 3: Place the sprinkler before turning on the water. This sounds obvious but it matters, because the spray pattern is much easier to judge dry-run than when you are already wet. Set it at the edge of where you want the watered zone to start, not in the center.
Step 4: Turn the water on fully. Partial pressure produces partial pattern. Most sprinklers are designed for full flow.
Step 5: Watch one complete cycle. For an oscillating model, watch it complete one full sweep. Note where the water actually lands rather than where the spray appears to go. Wind, slope, and low pressure all shift the pattern.
Dialing In Sprinkler Coverage
Most portable sprinklers cover between 15 and 50 feet in each direction, depending on pressure and model. The published range on the box assumes full pressure on a calm day. Reduce that by 20 percent for a real-world estimate.
Overlap is your friend. Aim for about 30 percent overlap between sprinkler positions when you move the head. If you try to exactly tile the coverage circles with no overlap, you end up with dry seams between passes. Those seams become obvious in a dry spell.
Check for gaps with a simple test. Place five or six straight-sided cans (tuna cans work well) in a line from the sprinkler out to the edge of the pattern. Run the sprinkler for 15 minutes, then measure the water depth in each can with a ruler. The readings should be roughly consistent. If the outer cans are nearly empty, the pattern is not reaching as far as you thought. If the inner cans are overflowing, you are watering too close to the head.
Watch for runoff. Slopes and compacted soil can cause water to sheet off before it soaks in. If you see runoff forming within the first few minutes, break the session into shorter cycles: run for 10 minutes, let it absorb for 30 minutes, run again. This is more effective than a single long pass on any soil that does not drain quickly.
Adjust for the yard shape. Rotary sprinklers with arc adjustment let you set the coverage to exactly the angle you need. Dial the arc so the full sweep stays inside the lawn boundary. The few square feet you miss near a fence are better than the water you waste on pavement or a neighbor's property.
How Long to Run a Sprinkler
The general guideline for most established lawns is to apply about one inch of water per week, total across rainfall and irrigation. In peak summer heat, that can rise to one and a half inches.
The can test from the coverage section doubles as a runtime calculator. If your cans collected a quarter inch of water in 15 minutes, it would take 60 minutes to apply one inch. That is roughly one session per week in normal conditions, or two shorter sessions if you are dealing with runoff on sloped or compacted ground.
A few factors shift that baseline:
- Soil type. Sandy soils drain fast and may need shorter, more frequent sessions. Clay holds water longer and benefits from the cycle-and-soak approach above.
- Grass type. Cool-season grasses like tall fescue and Kentucky bluegrass often need more water during summer heat than warm-season grasses like bermuda or zoysia. Local extension offices can give you targets for specific grasses in your region.
- Time of day. Morning watering (before 10 a.m.) loses far less water to evaporation than afternoon or evening sessions. Evening watering leaves blades wet overnight, which can encourage fungal disease.
- Recent rainfall. Check before each session. A rain gauge near the lawn is cheap and useful.
Early fall is usually when irrigation demand drops off significantly as temperatures cool and grass growth slows. September watering for cool-season lawns may be more about supporting fall overseeding than routine hydration.
Making Adjustments Over Time
A lawn sprinkler is not a set-and-forget piece of equipment. A few adjustments improve results season over season.
Watch the lawn, not just the timer. Grass tells you when it is thirsty: blades fold slightly lengthwise, and footprints stay visible longer than usual. Those are signals to water, not a schedule.
Move the sprinkler position between sessions. Even a few feet of shift helps even out the slightly higher application rate near the sprinkler center versus the edges.
Clear the filter screen occasionally. Most hose-end sprinklers have a small filter screen where the hose connects. Hard water and sediment can reduce flow over a season. Unscrew the connection, pull out the screen with needle-nose pliers, rinse it under tap water, and reassemble.
Store it correctly at the end of the season. Drain the hose fully before the first freeze, and bring portable sprinklers indoors. Plastic components crack in hard freezes, and the repair cost is higher than the storage effort.
The same attention to condition applies to your mowing equipment. If you have been putting off blade maintenance, how to sharpen and balance a mower blade walks through that process in full.
Frequently Asked Questions
How do I know if my sprinkler is covering the lawn evenly?
The can test is the most reliable method. Set out several straight-sided containers across the coverage zone, run the sprinkler for a set time, and compare the water collected in each can. Wide variation between cans signals that you need to adjust placement, check pressure, or switch sprinkler types.
Can I run my sprinkler every day?
For established lawns, daily light watering is generally less effective than less frequent, deeper sessions. Shallow daily watering encourages shallow root growth, which makes grass less resilient to heat and drought. Aim for one or two deeper sessions per week rather than a daily light pass.
My sprinkler throws water too far and hits the driveway. What can I do?
If you have a rotary or impulse sprinkler, check whether it has an arc adjustment collar. Most do. Set the arc so the full rotation stays within the lawn boundary. For oscillating sprinklers, some models have adjustable end tabs that limit how far the arm swings in each direction.
Why does my sprinkler seem to water unevenly even when it looks symmetrical?
Wind is the most common cause. Even a light breeze shifts the spray enough to create dry spots on the downwind side and wetter ground on the upwind side. Water during calm periods when possible, usually early morning. Low household water pressure during peak demand hours (evenings when neighbors are also irrigating) can also reduce throw distance.
Is there a difference between watering new seed versus established turf?
Yes, meaningfully so. Newly seeded areas need consistent light moisture at the surface until germination and early establishment. That usually means short, frequent sessions, sometimes twice a day in hot weather, to keep the top half inch of soil from drying out. Once the grass is established, shift to the standard deep, infrequent approach. Overwatering established turf the same way you water new seed leads to shallow roots and disease pressure.